18/12/2016

Armorcast Warhound #1 - 40

It was too fast, there won't be any post #42 for my first Armocast titan.
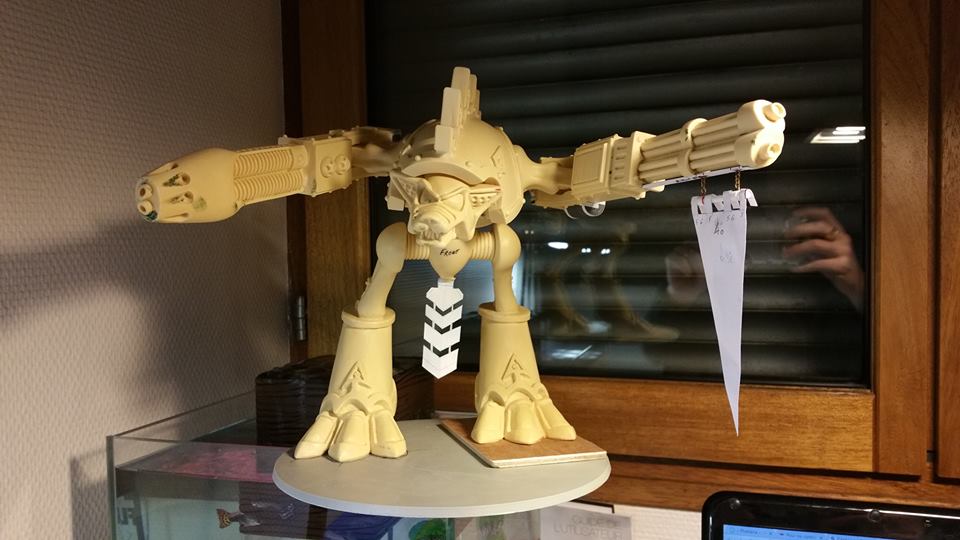
Ready for the Battle !
The banner's created with oldies and wome personnal stuff.

You can find :
- the warhound's "m" 
-T for Adeptus Titanicus
-The French Britain Cross
I added some extra detail son the warhound's rear. Based on the epic model, there wasn't much.

I tried to use bigger cables, but due to mecanical problems, I had to choose smaller ones. They seem a bit too small, unfortunately.
The base.

I tried my best.

Wish you enjoyed it, I'm working on another one...

06/12/2016

Technical Break before a new start

Now I finally founded a new home, I need to prepare my stuff. This is why I tried to sort all of my Holly Hobby before I leave.

I solded enough stuff to buy two Burning of Prospero boxes and stay on three projects only. All the other projects where solded or letted down.

Now, here's my to do list :

    1- Dark Angels
    2- Armorcast
    3- Horus Heresy

#1- stand by, i'm not painting anything before some years.
#2- one Warhound down, one more to go. And three reavers too.
#3- 150 SM from the Mk II to Mk V tp prepare...

Stay tuned !

19/11/2016

Armorcast Warhound #1 - 39


Banner is painted and on the Warhound.
Last step : the base.
I'm not good at it, but I'll do my best.

14/11/2016

Armorcast Warhound #1 - 38


Back to work !


I didn't post anything last week, I was with my children. As a divorced father, these times are more important than our Holly Hobby.


I created the banner as a mix from old v2 banners, with some Forge ref.


On top, you have the old Warhound symbol. Then the T for the titan legio, remixed with some pointy eighties flavor.
(yes, I'm a metal head)

I still need to paint it in red and black.


One big regret : I didn't use magnets when I created the banner support.
It's glued under the Mega Bolter, which means I can't remove it for transport. :-(

23/10/2016

Armorcast Warhound #1 - 36

No real progress on the warhound this week, just added some,more aging on the titan. 

I finally found enough time to work on the last missing detail on the left leg. 


Ultra thin plastic card, grey primer, some hours drawing et voilà.

I still need to paint like a parchment, redraw all the letters and glue it on the titan left leg. 

09/10/2016

Armorcast Warhound #1 - 35


I have done a lot of work this week.
I finally founded how to rust the white parts and it works pretty well.

Both arms are battle damaged, so does the body and the head.

To do list :
 - Add a parchment on the left leg
 - Redo the rust on the shield generator
 - Get every part soiled
 - Create the banner
 - Finish the base

And, if I'm working hard enough, she'll be ready before Halloween.
(stay tuned !)

30/09/2016

Armorcast Warhound #1 - 34

Close up on the right leg

Still workin on the battle damages.

I'm not really satisfied with these but it's better than what I did before.

12/09/2016

armorcast-warhound #1 - 32


I'm now working on the warhound's arms.
Mega bolter and plasma gun.

I have some pink shadows on the plasma, because I didn't use the right brush. 😕

Anyway, it's fun tonwork'on this old lady, she's impatient to be back on the battle field

05/09/2016

Armorcast Warhound #1 - 31

 It's been a while, but I'm back.

Painted the eyes before puting her on her legs, where she waits for her arms.

I didn't show any legs' details, so here you are :

-on the left : right leg's detail. I created a unicorn symbol in a 80's mimimalist style.

- on the right : the ace of spades before painting. Needed some preparation.


23/08/2016

Armorcast Warhound #1 - 30


It's not because I had some holidays that I wont work on the warhound.


Legs are done for now.
Hunting group, trophies checkered leg and Princeps symbol are painted.

I'll work on the metallics later.


Right now I'm working on the uper body.

I don't know if I'll keep it clean or add some symbols.

12/08/2016

Armorcast Warhound #1 - 29

Many news since last post.

First, I finished the icons.
There's a unicorn on a blue circle on the right leg, ande a red lightning and a yellow ace of spades on the left leg. 

I made the first red highlights, more to come. 

And the shield generator paint was modified. 

And the Base is painted, but not finished. 

31/07/2016

Armorcast Warhound #1 - 28

How did I get the checkered leg ?

First, you have to apply masking tape on the leg, even where you need the checkered paint.


First, you have to trace all the vertical lines.

It's easier when the horizontal ones aren't done yet, because you need to place all these lines around the leg.
And they aren't parallel to each other.
Because the base is larger than the top.
It's a bit tricky but once you get it, it's easy to do.

Good news : horizontal lines are parallel to each others. ;-)

Now all the lines are on the aera you need to be checkered, you need to put some pencil to see the checks.

The penciled squares will be removed and painted in the new color.

After using some sharp tool to cut the squares that have to be removed, you can see the checkred aera take place.

Red undercoat, et voilà...

10/07/2016

Armorcast Warhound #1 - 26

Grey undercoat ? check.
White undercoat ? check.
Black undercoat ? check.
...

Lets add some masking tape and get the warhound ready for the red undercoat.

Then everything will be ok for the real painting time.

03/07/2016

Armorcast Warhound #1 - 25


Now I'm back on tracks, the second color is applied.

I'll use the same color sheme, like the one I used for my previous knights.

Next color will be black. and then... RED.

26/06/2016

Armorcast Warhound #1 - 24

Seems my last week post disappeared in the warp...

Last week, i was finally done with the greenstuff on all the warhound parts.


Or so did I think...
I undercoated some parts and, when it dried, I discovered a bunch of tiny holes and flash lines I didn't see before.
[Cries out loud]


I took some minis plastic filler and used to fill all the holes in could see now.

I'll go back to bases colors when I'm done with the holes filling stuff for the second time...

14/06/2016

Back to gaming !

When you see you can't get anymore motivation for your projets, you know it's time for a game.

We had a game last sunday, a 2 vs 2, with wome 1.5k armies.

It was an awkward alliance between Orks (korsairs) and some White Scars vs Dark Angels and UltraSumrfs.
At the third -and last- turn, I finally allowed the terminators to rain on the table. 

Seeing this, one scout sergeant yelled from the top of his lungs "YOLO!!!" and sprinted for an epic fight with the Big Boss and his Nobz.

No need to say that he was dead before the end of the turn...


Unfortunately, we couldn't play more than three turns.
It finished on a draw.


It was a fun game and I was really happy to play again.

Last time I played was in august, 10 month ago.
I needed time to heal some scars.


01/06/2016

Armorcast Warhound #1 - 23

Hi all

I'm not dead, neither did I let it go. ;-)

When I said I was ready to be back on tracks, life just laughed and sender me more lemons than I needed.

Now then sh*the storm is, almost, over, I worked on the warhound.

I added some more greenstuff on the warhound. 

Sand papered it. 

Next step, finishing the Base and... undercoat !


24/04/2016

Armorcast Warhound #1 - 22


It's so good to be back.

I'm back on this big project, creating a warhound to fight along my -future- Apocalypse Death Guard army.

Even if I had to stop, I'm still motivated.
I had time to think and think again about this project.

This is why I added details to the floor's trap.
And the warhound's foot is not very kind with my work.


18/04/2016

Armorcast Warhound #1 - 21


I'm back.
Had my share of familly problems, demotivation and life surprises.

Meh.

Finally came back to the one and only Holly hobby, where I can find peace and silence.

I'm actually working on the base, placing magnets for the warhound's left leg.
Both legs will "magicaly" take place on the base.

Added some details on the base, to create a "loading dock" look.

I'm back, and I'll try to keep it up.

21/03/2016

Armorcast Warhound #1 - 20


I finally received my Vallejo surface primer. 
I never tried it before but it seemed better for me to have a grey base on all the mini.
It'll be easier for me to add the white, black and red primer.

Base is on WiP, and I had some ideas while working on it.
Stay tuned, I'm on it...

14/03/2016

Armorcast Warhound #1 - 19

Last steps before paint.

Working with the very few details I founded, identification symbols will be added on the warhound.

On the right side, a blue disc with a unicorn inside
The blue disc is the princeps rank, the unicorn is for the princeps' emblem.


On the left, a yellow ace of spades, the warhound's hunting group symbol.

All these symbols will be painted on the legs' external side, and the shell.


Each legs' inner side will be different.

On the right side, there'll be a black and red checkerboard.
I'll use it as a killer board.

On the left, side, a red lightning.
A fast attack symbol.


The base is a WiP, I'm working onit and waiting for some materials.


08/03/2016

Armorcast Warhound #1 - 18

Last researchs for the banner.
I need a break.

I'll work on the base and, as soon as the paint can are here, it will be brushes time !

29/02/2016

Armorcast Warhound #1 - 17

Drawing some sketches for the warhound's leg design.

The princeps' emblem will be a unicorn, on a blue circle.
(I'm totally in unicorns, sorry)

Now, back to the banner's design.

20/02/2016

Armorcast Warhound #1 - 16

 The more time I pass working on the warhound, the more I feel it needs to be a Rogue Trader inspired model.

As I know I'll get an apocalyspe Death Guard Pre-Heresy army, I decided to take this warhound back in time and paint it with an 80's color scheme and RT's time marks and identifications.
On the left, last tries and redo for the banner.


It'll be a killing banner.

Divided in two equal parts.

  • On the left, keep it white except for a Moon Knights symbol recall.
  • On the right, a pattern for the kills.

The blue round with a unicorn is the Princeps insignia.

14/02/2016

Armorcast Warhound #1 - 15


Shield generator fabricated, glued and ready for the paint.

And now I placed the banner support to the backwards position, I need... a banner.

I'm working on it, as you can see on the left.

09/02/2016

Armorcast Warhound #1 - 14

Now the superbowl is over, I can finally post.
(even if I'm french, I was in front of my tv to watch it !)


I decided to add a shield generator to the warhound.

It will be inspired by the Knight Errant, still in WiP.


On the left, some sketches to get it right.
I'm not far away from the final form.


As you can see above, I prepared a paper form before cutting the plastic.
It help to see the generator IRL. Almost.
Finally, the generator will have a diamond shape, and will be smaller.
 
Last but not least, the banner will be moved backwards.

01/02/2016

Armorcast Warhound #1 - 13

Working on the banner's chains.

I used .8mm chains.

Now I need to find the best length.

25/01/2016

Armorcast Warhound #1 - 12

Now I'm done with the banner support on the mega bolter, I wandered on the net.
And I saw this heavily modified warhound.
The amount of details added onthis titan is impressive and it gave me ideas.
One Games Workshop barrel cuted in half, some plastic card later, et voilà.

17/01/2016

Armorcast Warhound #1 - 11

I was productive this week. 

First : magnets under the right foot are done ! 
Three 5 mm magnets will help to keep the warhound up, while I didn't decide what I'll do under the left foot.

Then, I added some banners.
And that didn't fit.
At all.

I decided to cut the width by half, and to keep the pointy one.

Problem was, with the new width, banners didn't fit under the Mega Bolter anymore.

I decided to add some protection
to the underside. 

Slowly and very carefully, I removed enough resin to allow the new 85 x 4 mm plastic card part to fit in.

It's thickness is only .3mm, which isn't enough.
I'll try with a .75mm and I hope the result will be better.

07/01/2016

Armorcast Warhound #1 - 10

Hello everybody, I'm back.
Sorry for the delay, seems my last post didn't on the right blog, 
and I hadn't the internet nor the PC for a long time so... I'm sorry for this delay.

Good news are good : I'm back on tracks for the warhound.


Both arms and rear alimentation and command racks are done.
It took me time, try and error, do and undo...
But it's finally done.

I magnetised all the panels, to make it easy to remove and transport.