Showing posts with label WiP. Show all posts

15/02/2017

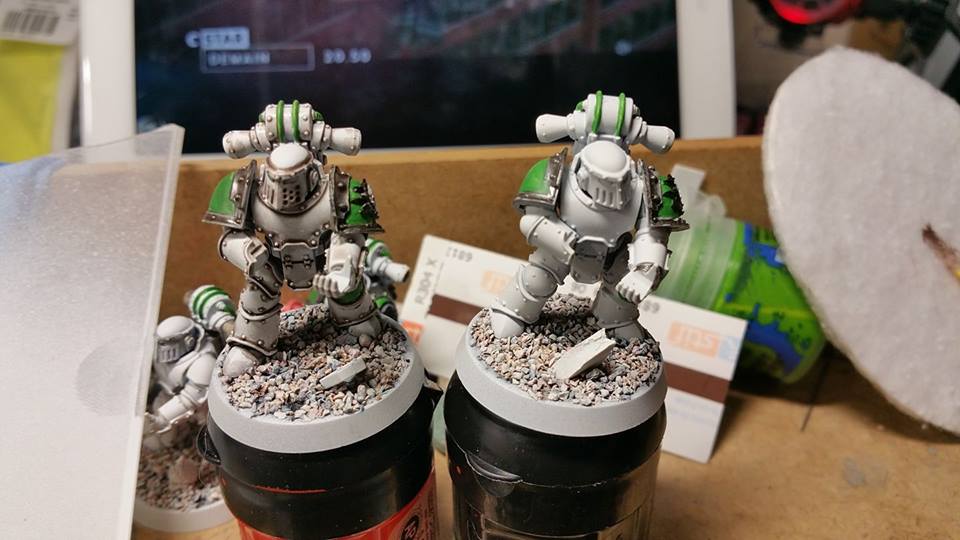
Death Guard - 04

I have the painting scheme.
I have Prince Augunst #822 for the shading.

And it looks pretty good, even if it's easy to prepare.


Six down, many more to go !

05/02/2017

Death Guard - 03

Weeks are the same : it's difficult to find motivation for the Holly Hobby when the year starts with bad news.

My two first minis were crap. I couldn't paint the color scheme I had in mind.

Too complicated, too long and too much painting time needed.
Second try.

No mistakes done, I finally founded what I had in mind.

This is just the bases, I still need to work on it.

16/01/2017

Heresy Death Guard - 02


Back to painting minis.
After one complete year on a "small" titan, it's a bit difficult to work on such a small scale...

I'm still working on the colors, and didn't decide everything.
But it's a new start for me, with bright colors. (yay!)


01/01/2017

Death Guard - 01


Hello you all happy tax payers, have a happy new year !

Now the Warhound is finished, I'm on a project I really wanted to work on since Forge World started the Hesery miniatures.

I'm using Prospero Burns Mk III plastic minis to create a 30k Death Guard army.

For a start, I'll paint a 1k points army, but I won't stop here.

19/11/2016

Armorcast Warhound #1 - 39


Banner is painted and on the Warhound.
Last step : the base.
I'm not good at it, but I'll do my best.

14/11/2016

Armorcast Warhound #1 - 38


Back to work !


I didn't post anything last week, I was with my children. As a divorced father, these times are more important than our Holly Hobby.


I created the banner as a mix from old v2 banners, with some Forge ref.


On top, you have the old Warhound symbol. Then the T for the titan legio, remixed with some pointy eighties flavor.
(yes, I'm a metal head)

I still need to paint it in red and black.


One big regret : I didn't use magnets when I created the banner support.
It's glued under the Mega Bolter, which means I can't remove it for transport. :-(

23/10/2016

Armorcast Warhound #1 - 36

No real progress on the warhound this week, just added some,more aging on the titan. 

I finally found enough time to work on the last missing detail on the left leg. 


Ultra thin plastic card, grey primer, some hours drawing et voilà.

I still need to paint like a parchment, redraw all the letters and glue it on the titan left leg. 

09/10/2016

Armorcast Warhound #1 - 35


I have done a lot of work this week.
I finally founded how to rust the white parts and it works pretty well.

Both arms are battle damaged, so does the body and the head.

To do list :
 - Add a parchment on the left leg
 - Redo the rust on the shield generator
 - Get every part soiled
 - Create the banner
 - Finish the base

And, if I'm working hard enough, she'll be ready before Halloween.
(stay tuned !)

30/09/2016

Armorcast Warhound #1 - 34

Close up on the right leg

Still workin on the battle damages.

I'm not really satisfied with these but it's better than what I did before.

12/09/2016

armorcast-warhound #1 - 32


I'm now working on the warhound's arms.
Mega bolter and plasma gun.

I have some pink shadows on the plasma, because I didn't use the right brush. 😕

Anyway, it's fun tonwork'on this old lady, she's impatient to be back on the battle field

05/09/2016

Armorcast Warhound #1 - 31

 It's been a while, but I'm back.

Painted the eyes before puting her on her legs, where she waits for her arms.

I didn't show any legs' details, so here you are :

-on the left : right leg's detail. I created a unicorn symbol in a 80's mimimalist style.

- on the right : the ace of spades before painting. Needed some preparation.


23/08/2016

Armorcast Warhound #1 - 30


It's not because I had some holidays that I wont work on the warhound.


Legs are done for now.
Hunting group, trophies checkered leg and Princeps symbol are painted.

I'll work on the metallics later.


Right now I'm working on the uper body.

I don't know if I'll keep it clean or add some symbols.

12/08/2016

Armorcast Warhound #1 - 29

Many news since last post.

First, I finished the icons.
There's a unicorn on a blue circle on the right leg, ande a red lightning and a yellow ace of spades on the left leg. 

I made the first red highlights, more to come. 

And the shield generator paint was modified. 

And the Base is painted, but not finished. 

31/07/2016

Armorcast Warhound #1 - 28

How did I get the checkered leg ?

First, you have to apply masking tape on the leg, even where you need the checkered paint.


First, you have to trace all the vertical lines.

It's easier when the horizontal ones aren't done yet, because you need to place all these lines around the leg.
And they aren't parallel to each other.
Because the base is larger than the top.
It's a bit tricky but once you get it, it's easy to do.

Good news : horizontal lines are parallel to each others. ;-)

Now all the lines are on the aera you need to be checkered, you need to put some pencil to see the checks.

The penciled squares will be removed and painted in the new color.

After using some sharp tool to cut the squares that have to be removed, you can see the checkred aera take place.

Red undercoat, et voilà...
10/07/2016

Armorcast Warhound #1 - 26

Grey undercoat ? check.
White undercoat ? check.
Black undercoat ? check.
...

Lets add some masking tape and get the warhound ready for the red undercoat.

Then everything will be ok for the real painting time.

03/07/2016

Armorcast Warhound #1 - 25


Now I'm back on tracks, the second color is applied.

I'll use the same color sheme, like the one I used for my previous knights.

Next color will be black. and then... RED.

26/06/2016

Armorcast Warhound #1 - 24

Seems my last week post disappeared in the warp...

Last week, i was finally done with the greenstuff on all the warhound parts.


Or so did I think...
I undercoated some parts and, when it dried, I discovered a bunch of tiny holes and flash lines I didn't see before.
[Cries out loud]


I took some minis plastic filler and used to fill all the holes in could see now.

I'll go back to bases colors when I'm done with the holes filling stuff for the second time...